Sunday, April 19, 2009

No Need To Knead

A couple of years ago, The New York Times created a foodie sensation when they published an article about creating Artisan Bread without kneading.

Since then it has been slightly refined here and there, and this is the version I have found best.

Mix the following into a bowl:
2 1/2 c bread flour
1/2 c whole wheat flour
1 t salt
1/4 t yeast (yes, just 1/4 teaspoon!)

...so that it looks like this.

Add 1 1/2 c warm water to it and stir. You're going to think this is WAYYY too much water because it will be a gloopy mess that sticks to everything - the bowl, the spoon, you name it.

Cover it in plastic wrap and let it sit for 12-24 hours.

Hey, I didn't say it wasn't going to take some time, just that it wouldn't need kneading. I usually shoot for 18 hours. Keep it in a warm place so the yeast can do its thing until it looks like this:

Here's the part where things get really sticky and gooey. Flour a board thus:
and dump that wet lump of dough onto it. (No pictures here because my hands were full of wet, doughy yecchhh.) Sprinkle some flour on top. Fold the sides over a few times. I generally do it from all four sides. This isn't kneading, it's just knocking a bit of air out of the dough and remixing the stuff so the yeast gets active again.

Put a well-floured, cotton (non-terrycloth) tea towel in a bowl (or just on the counter if you want) and toss the lump o' dough in it.
Drop the corners of the towel over the dough to cover and let it sit for two more hours.

With 30 minutes of rising left, put a covered, enameled cast-iron, dutch oven in a 450 degree oven to heat up. Anything from 3 1/2-quart size on up is fine. I've read the perfect pot is a French-made, Le Creuset, 5 1/2-quart size, but that's like a $225 pot! No thanks. I and my bank account are perfectly satisfied with my $39, 6 1/2-quart one.

Carefully toss the ridiculously sticky blob into the VERY HOT dutch oven, cover, and bake for 30 minutes. Then take the lid off and bake for another 15 - 20 minutes. It will look something like this:

It doesn't stick to the pot at all. Remove it carefully to a cooling rack.

This may be the coolest part of all! LISTEN CAREFULLY TO THE BREAD. IT'S CRACKLING! Because the crust is so hard, it condenses as it cools allowing the molecular structure of the crust to slightly break down.

Let it completely cool before trying to slice it. It's going to be sticky no matter what, but if it's warm the job will be even tougher.

The crust will be difficult to crack, so I recommend using an electric knife or a very good, serrated, bread knife. Also, because of the high water content the crust won't always stay hard so I slightly toast my slices before eating.

I've made lots of bread machine bread before, but it's NOTHING like real, artisan bread. This bread is holey and chewy and "rugged" in both its taste and appearance.

I made some creamy, creole white beans while baking the bread today and ate them together. Talk about good!

Saturday, April 11, 2009

Crescent City Classic: More Of A Fun Than Serious Race For Me This Year

Here's how the New Orleans Times-Picayune newspaper photographed the start of today's 20,000-runner Crescent City Classic 10K race. Do you see me there? ;-)

I suppose it's all how you look at it.

Three weeks ago I was limping with a Grade II Right Calf strain, threatening to keep me from running today's Crescent City Classic - not my longest race at only 10K, but my favorite race of the year because of the no-other-race-like-it, carnival-like atmosphere. I wrote about my injury here.

I took a full two weeks off from running hoping it would heal on its own. It got somewhat better, but it didn't heal completely.

I made it through three runs this week just to get some blood flowing through my legs and hoping that I wouldn't re-injure myself.

Well, I made it through the race today, but the lack of recent running and the tenderness of my hurt calf showed. I was hoping I could still run something around 45 minutes (7:15 per mile). In fact, I was on pace for that through the first two miles, but as I felt the tenderness growing in the third mile I couldn't maintain it.

For miles 4, 5, and 6.2, I had to drop to about 8 minutes per mile finishing around a disappointing 48 minutes (7:44 per mile average). I was afraid to push it to a painful re-injury so I just maintained that 8-minute pace to the end.

I know, I know. I should be happy I was able to participate at all. And I am.

But since going vegan in May '08, every race I've run has been a PR (personal record) or very close to it, and with no different training than I had ever done. A month ago I had high hopes for this, my first 10K race since then, but instead this one broke the streak.

With the disgustingly sweltering New Orleans summer heat and humidity coming soon, I won't be able to do any fun long runs for quite awhile. That's probably a good thing as it will let me heal. And as area races soon dwindle down to 5K, 3 miles, and during the worst months, just 2 miles, I'll still have some fun times ahead.

Several people have suggested over the past three weeks I look at taking up biking. It's low-impact, easier from an endurance standpoint, and uses different muscles to allow for healthy cross training. New Orleans had a Half-Ironman Triathlon (swim, bike, run) last week. I suppose Triathlons, or more likely for me, Duathlons (run, bike, run) are things to think about for the future.

I guess I'd need to get some kind of road bike though, huh? Well, we'll see.

Sunday, April 5, 2009

VitaMix vs. Blendtec: Comparing the High-End Blenders (Part 2 of 2 Blender Showdown Articles)


Having tried and been disappointed with the so-called "best" of the moderately-priced blenders, I knew the choice was clear – VitaMix or Blendtec. These were clearly the two best known and heavily marketed high-end blenders available. In fairness to both, the major smoothie chains – Jamba Juice, Planet Smoothie, Smoothie King, and Starbucks to name a few – use one or the other of these machines so I knew there was no going wrong with either.

A good friend of mine who had unfortunately just moved away had gotten a VitaMix as he ventured into the raw food movement – an interesting idea I have read quite a bit about, but have yet to try.

There was no question the VitaMix was a good machine, but Blendtec’s “Will It Blend” videos and “Today Show” demonstrations caught my eye as they directly named and compared their blender to the VitaMix.

Here are the truthful comparisons as stated by Blendtec:

The Blendtec has a 3 horsepower (HP) motor. The VitaMix has a 2 HP motor.

The Blendtec is 5 inches shorter allowing it to fit under most cabinets. The Vitamix does not fit under most cabinets, although a smaller, optional wet-jar does fit under cabinets fine.


The Blendtec fit under the glass shelf easily.


The Blendtec weighs 4 pounds less. The VitaMix at 11 pounds is more difficult to move.

The Blendtec draws 13 amps on a 1500-watt motor. The VitaMix draws 11.5 amps on a 1200-watt motor. (Note: not really an advantage - see below.)

The Blendtec has 30 automatic cycles and shuts itself off at the end of the cycles. The VitaMix must be manually run and shut off.

The Blendtec has two prongs on its blade allowing it the versatility of blending wet and dry ingredients. The less cluttered bottom also makes it easier to wipe clean and dry. The VitaMix has a four-prong blade design that requires the additional purchase of a jar with a slightly different blade design for dry ingredient blending (grinding wheat, coffee beans, etc.).


The VitaMix has four pointed prongs on its standard, round, wet-jar container while the Blendtec has two blunt-end blades in its one, square-jar container.


The Blendtec warranty on the coupling and blade is for a lifetime. The VitaMix warranty on the coupling and blade is for seven years.

The Blendtec was slightly cheaper. The VitaMix is currently $50 more expensive and that’s without the optional dry ingredient jar purchase costing up to an additional $99.

The Blendtec square jar allows pouring in three directions (any corner except on your hand!) while the VitaMix only has its one spout.

I also found the black printed measuring markings on the Blendtec jar easy to read. The VitaMix uses transparent raised markings that aren't as obvious. The optional, smaller VitaMix jar does have easy to read, black, printed measuring markings

When I found the Blendtec on a special sale for $75 off their already lower price I was sold.

For two years I have used and enjoyed the Blendtec. It has blended the toughest frozen smoothies and nothing has ever gone wrong with it. It has performed admirably, but, as you’ll see, I wasn’t convinced it was the perfect blender either.

BLENDTEC RATING – a stellar 9 / 10.

Last week, I went to the New Orleans Home and Garden Show in the Superdome where VitaMix had a demonstration booth. After talking to the people there, checking it out for myself, and getting their “show-only” deal I bought the VitaMix knowing that one of the blenders would be immediately be sold or returned.

After the first smoothie in the VitaMix, I knew I would put the Blendtec on ebay.

Because Blendtec directly compared the two machines to show its advantages, it's only reasonable that I list the VitaMix advantages that swung me to their side.

First and foremost, the VitaMix is fairly loud, but noticeably less so than the Blendtec. Do you remember the ear protection I needed with the Oster blender? I still needed it for the Blendtec, but I’m comfortable without it for the VitaMix. Obviously, this was something I sensed immediately at the demonstration booth.

When I wanted to run the Blendtec and my wife was watching TV nearby, I would warn her and make sure it was OK to blend so it didn’t interfere. She hated the noise! If the dogs were in the room where I blend, I would make them leave because I feared it might hurt their sensitive ears.

The VitaMix isn’t nearly as much of a problem. Blendtec falsely claims in their comparison chart that the VitaMix is louder, but it most assuredly is not.

The “show-only” deal for the VitaMix (brand new models, not refurbished) sold them with a special, longer, eight-year warranty (instead of seven) while the Blendtec’s warranty (except for the blade and coupling) is only three years. I had one year left on the Blendtec warranty.

The “show-only” deal also included a coupon for $40 off any blending jar accessory, bringing the optional dry blade container cost down to $59.

The “show-only” deal also included an extra book not even offered on the Vita-Mix website called, “Beating Cancer With Nutrition” – not a big deal, but a nice lagniappe anyway.

Speaking of books, Blendtec’s recipe guide is rather lackluster while VitaMix’s is more complete.

I had long ago discovered Vita-Mix’s excellent smoothie web page at VitaMix Smoothie Recipes. Blendtec has more recently added a smoothie page at Blendtec Smoothie Recipes, but it’s not as good (an orange juice smoothie without fresh oranges?).

Also, it’s just a marketing decision, but Blendtec appears to have largely ignored the raw food community whereas VitaMix actively encourages its use for those practicing a raw, live-food diet. I'm not often a raw-foodist and I'm sure Blendtec will change this in time, but it is a bit surprising.

Besides the noise factor, the Blendtec also named some “advantages” in their advertising I mentioned above that aren’t really advantages at all. The amp and wattage “advantage” only means that the Blendtec uses more electricity to run than the VitaMix does, and has no performance boost as a result.

The 3 HP versus 2 HP is true regarding the higher top strength of the Blendtec motor, but the higher strength doesn’t mean better blending because of other factors, such as blade speed, blade design, and jar design.

The Blendtec has automatic cycles that shut off by themselves when they’re completed, but how often will you need or even want to walk away for some period of time after turning on a blender? And if you do, how will you know the blending finished without needing to be run some more to complete the job?

The Blendtec advertising claims that its 2-prong blade and square jar construction mean that the ingredients are always drawn into the center and that cavitation (the blade running with cold ingredients not getting mixed) won’t occur. This, they claim, means it doesn’t need a tamper to move ingredients around while it’s running like the VitaMix. This is not true. Their instruction booklet even mentions what to do when it happens. When it occasionally occurred, I had to shift the contents (usually by lifting up and shaking the air bubble out) and run some additional time in the Blendtec after the smoothie cycle ran.

The tamper makes the VitaMix even taller, but it easily pushes ingredients safely into the spinning blades below.
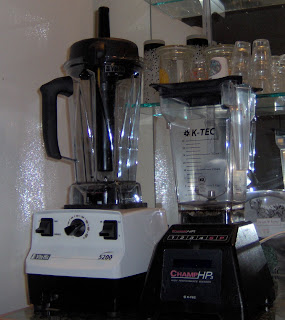
The Blendtec experiences cold ingredients freezing up and staying away from a fast spinning blade just as any blender, including the VitaMix, does, but the designed inclusion of the VitaMix tamper is an essential addition and a huge advantage over the Blendtec. Third party manufacturers of tampers (strongly recommended) for the Blendtec offer them for sale on ebay to even this out, but Blendtec’s claim that they’re unnecessary is decidedly incorrect.

The tall VitaMix blender jar also means that there is a reduced chance of ingredients being thrown against the capped lid than on the shorter, wider Blendtec’s, which keeps things a little cleaner. The Blendtec’s wide, airy, jar bottom maintains a very slight edge in cleanup of the bottom around the blades. Even on the VitaMix, it’s just a slightly tighter rinse and wipe operation, though.

The manual, 10 speed setting on my model of the Blendtec was sometimes awkward if you wanted to stop it on a specific number under 10, say, speed number 8, because the numbers ramp up rather quickly and you pick the speed by releasing the button when it reaches the number you want. More recent models have a speed up and speed down option to make this easier to accomplish. The VitaMix, on the other hand, has a variable-speed knob and a special high setting above the top knob setting which is used to work on tough blending jobs like frozen smoothies. I strongly prefer the easy manual control of the VitaMix.

Blendtec’s smoothie cycle is pre-set (listed as button #3 on some models like mine) on its front, but that cycle only goes up to speed number 8 and for only 6 seconds at the end of the cycle. This isn’t enough for many frozen smoothies even if cavitation hasn’t occurred at the earlier, slower speeds programmed into the smoothie cycle. It sometimes takes a few more seconds holding in the pulse button at the end.

Blendtec’s top speed of “10” spins its two, wide blades at 28,000 RPM. VitaMix’s top speed of “High” spins its four blades at 37,000 RPM. This, more than anything, provides faster and better blending ability by the VitaMix despite Blendtec’s additional horsepower motor. Blendtec’s 3 HP motor may provide additional strength, but I’m not trying to blend hot tar or congealed glue so VitaMix’s still awesome 2 HP motor is perfectly adequate for my tasks.

Again, don’t consider this a put-down of the Blendtec’s ability. It is an awesome blender and has some advantages, but simply not as many as the VitaMix. The excellent reputation of the Blendtec was shown by me nearly getting my original purchase price back in selling the two-year-old machine because of the great sale price I found when I bought it.

Having now bought the VitaMix means I will have no further significant blender investments for the next eight years of my warranty, and have not found any major drawback to the VitaMix’s performance whatsoever. Sure, it’s a significant cash outlay, but I’ve compared it for myself and found the investment worthwhile.


12 –CATEGORY SHOWDOWN

(The first five categories scored are rather minor, the next three can be important for some, and the last four are the most important to me.)

Cleanup – Even (but Blendtec with VitaMix's smaller blender jar.)

Strength of Motor Blendtec slightly, though I couldn't tell

Speed of Blade VitaMix slightly, though I couldn't tell

Measuring Markings - Blendtec (but Even with VitaMix's smaller blending jar)

Accessories/Extras – VitaMix (especially if purchased at a Live Demonstration)


Size – Blendtec

Versatility – Blendtec (but Even with VitaMix’s dry jar added)

Cost – Blendtec


Noise – VitaMix

Control – VitaMix

Warranty – VitaMix

Blending – VitaMix (but Even if the Blendtec is used with an added Third Party Tamper, especially on the Manual settings)


If the cost factor or the size of fitting a blender under a cabinet or shelf were in your most important category section, I wouldn't hesitate to buy a Blendtec and get a Third Party Tamper. Otherwise, for me, the VitaMix clearly wins.

VITAMIX RATING – an almost perfect 9.9 / 10 (improve the visibility of the measuring markings on the regular blender jar to make it perfect).

Friday, April 3, 2009

Product Review: Blender Showdown, Part 1 of 2 - The Moderately-Priced Oster Beehive vs. Braun PowerMax


As a longtime smoothie drinker, I have searched liquefy and stir (that’s “high” and “low” in blender-talk) for the perfect blender.

I began this search by reading what others had professionally researched, and they – Consumer Reports and America’s Test Kitchen – each decided on a “Best Buy” - a wonderful blender, they said, for a fraction of the cost of the high end blenders. 

That consensus pick was the Braun PowerMax. – a 525-watt blender with a glass jar that is uniquely triangular in shape down to its base. As I recall it was $50 - $60.

Immediately upon using it I was totally underwhelmed. It simply wouldn’t blend ice well enough. How can you possibly make a smoothie with frozen ingredients (as I always do) if it won’t chop the ice thoroughly?

Although it was very quiet, another drawback was its plastic gear drive. Plastic gears wear out far too easily, so I moved on after a few frustrating months. I gave the Braun to my sister who didn’t have a blender at all.

I can only assume that Consumer Reports and America’s Test Kitchen must have only been testing for the easiest blender tasks.

BRAUN POWERMAX RATING – 2/10 due to poor motor design and insufficient blending capability despite the excellent sound design.

The Oster Beehive was about $50 – $60, had a metal gear drive and some good reviews behind it as well. One cool thing I learned about Oster is that it can take a regular mason jar on its base if you want to blend right into a drinking vessel.

Be forewarned, though, that regular mason jars are not approved for that type of use. Still, I tried it with simple tasks and it worked.

The Oster also was unique in that it only had two speeds. I came to realize that, as long as the high speed was sufficient, two speeds was probably enough!

The Oster featured a square glass blending jar atop the metal-driven, 500-watt motor.

The Oster was a bit of an improvement over the Braun regarding frozen ingredients as long as you had enough liquid included and stirred things up a bit while it was running, but it still had some major problems.

Problem #1 – NOISE!!!!!

The Oster company does not do a very good job of sound insulation on this model. I literally had to wear ear protection when using this blender.

I’m not kidding. I kept foam earplugs in the drawer underneath the bar counter where the blender sat to put in my ears before I turned the machine on.

Problem #2 – The blending jar has a rubber gasket between the glass and the plastic base. The base has to be unscrewed after each use or else grimy things start growing. The jar, base, and gasket have to be separately rinsed and cleaned, then put back together every time you use it.

This was a major pain.

Problem #3 – The rubber gasket has to be seated perfectly and not overtightened when the base is screwed back on the jar or else it will get drawn up into the contents and blended causing a ruined smoothie and a broken seal which causes leakage.

After the third time I had to order a three-pack of gaskets, I was ready to move on to a new blender. The Oster went to my sister-in-law who didn’t have a blender yet.

(How can these people not have blenders? Oh yeah – because they, unlike you, my brilliant readers, have yet to discover smoothie greatness.)

OSTER BEEHIVE RATING - 4/10 due to poor noise and blender jar design despite a little better blending ability.

These were supposed to be the Best Buys, the darlings of the professional reviewers, the "just as good as the pricy ones." Having tried the best of these supposedly top-rated, moderately-priced blenders and been completely  disappointed I knew I had to throw in the towel, spend some major cash, and get a high-end blender.

It would come down to two models that I would also come to personally own and test - the Blendtec/Ktec Total Blender/HP3 and the VitaMix 5200 - the subjects of the finale of this series.

Thursday, April 2, 2009

A Real Smoothie


What? A blog post about smoothies? What’s the big deal about smoothies?


1. Throw fruit and liquid in a blender.

2. Turn on blender.


Isn’t that all there is to it? NO!


Several important questions need to be answered before you begin with step 1.


First and foremost, is this smoothie going to be creamy?

If so, you need to choose a special ingredient to make it so. My favorites are:

  • non-dairy milk (soy, almond, coconut, etc.);
  • non-dairy yogurt;
  • non-dairy ice cream;
  • silken tofu; or
  • banana.

For me this is almost always a yes, and I generally start with soy or almond milk and use one of the others, usually a banana.


If creaminess is not part of your smoothie, some of the alternatives to use as your base can include:

  • water;
  • juice;
  • watermelon;
  • grapes;
  • orange; or
  • carbonated water/soda/diet soda (betcha never thought of making a smoothie with 7-Up or Cherry Fresca before, did ya?).

Water adds hydration, but nothing nutritionally and it can dilute your smoothie so I’d only recommend it if your blender needs it.


Watermelon produces more liquid than any other fruit so that alone can work wonders. Grapes will tend to make a thicker, pulpy (pulpy is the smoothie opposite of creamy) smoothie and a peeled orange is somewhere in between.


My next question is whether you want protein to be part of the smoothie. If you are using this as a meal replacement, it really should be added.


Some of the best protein enhancers include:

  • protein powder;
  • non-dairy milk;
  • non-dairy yogurt; or
  • silken tofu.

I make my own soy yogurt, so tofu is clearly the most expensive alternative for me. As I said, I generally start with a milk and add something else if I want the protein boost. Usually, it’s protein powder.


Moving right along, we come to temperature. Do you want this to be a semi-frozen concoction, or just plain liquid?


If it’s going to be semi-frozen, you’ll need either frozen fruit/veggies or ice cubes. I prefer frozen fruit because too many ice cubes can dilute the smoothie, especially when the ice particles melt - providing it lasts that long, that is.


In other words, don’t use water as the liquid base if you’re going to add ice cubes.


The next question to decide is if this will be a “green” smoothie. By green, I don’t mean it has to have that as a final color, but it does require a green (the most nutritionally dense), leafy vegetable.


If so, you’ll want to consider:

  • spinach, raw or frozen;
  • kale;
  • collard/mustard/turnip greens; or
  • romaine lettuce.

Kale is the most nutritionally dense, but imparts a strong flavor. Spinach is less harsh while almost as nutritious as kale, but I don’t like to use raw spinach because it a) is expensive, and b) can inhibit the absorption of calcium.


A 10-ounce block of frozen spinach has already been blanched to neutralize the calcium inhibiting action, is very cheap, and is much more densely packed (5 ounces frozen = 1 cup raw spinach).


When I make a green smoothie with spinach, I simply put in a giant spoonful (or two) of the thawed out frozen stuff. If keeping raw, I prefer kale or romaine lettuce, which also has the benefit of being the green, leafy veggie with the least intrusive flavor.


Another great vegetable to consider is canned pumpkin. Use plain pumpkin if you want to avoid the added sugar in pumpkin pie filling.


What if you’re thinking about the healthiest possible smoothie? I already mentioned kale as the healthiest veggie, but there are some especially healthy fruits as well.


If health benefits are your number one concern, try to include one or more of these:

  • blueberries;
  • citrus;
  • papaya (best at aiding digestion, along with pineapple);
  • mango;
  • kiwi; or
  • red or black seedless grapes.

As with frozen spinach, bagged frozen fruit is very cost-effective especially if you buy it at the bulk/club stores.


My final options for smoothies are simply miscellaneous additions. Some you may consider include:

  • chocolate syrup / cocoa powder;
  • espresso / coffee / ground coffee / instant coffee;
  • extract (e.g. vanilla, almond, mint, coconut, etc.);
  • peanut butter or other nut butter;
  • spices like nutmeg, cloves, or cinnamon.
  • ground flax seed (or whole with the proper blender);
  • tea (especially green or herb);
  • wheat germ / wheat bran / oat bran / oatmeal;
  • maple syrup;
  • molasses;
  • sugar / sugar-substitute;
  • powdered non-dairy milk;
  • non-dairy creamer;
  • thickener (e.g. carageenan / xanthan gum / pectin);
  • agave nectar / brown rice syrup; or, oh what the hell...
  • rum / vodka / you name it.

I’ll be posting several of my all-time favorite smoothie recipes soon, but here’s my #1 favorite as pictured above:


DON'S CHOCOLATE-BANANA-STRAWBERRY SMOOTHIE


1 c chocolate soy milk (or regular soy milk with chocolate syrup)

1 small frozen banana (or 3/4 medium banana, or 2/3 giant-size)

2 handfuls frozen sliced strawberries (about 6 large whole)


How simple is that?

Tuesday, March 24, 2009

Creamy Breakfast Oatmeal

Not all oatmeal is created equal. The rule of thumb is that the longer it takes to cook, the better the oatmeal.

For me, the best (and longest cooking) oatmeal is steel-cut oats. You can see in the picture here that it's more like little nuggets than the rolled out and flattened flakes you're most used to seeing.

Cook it through and it creams up like any other oatmeal, but with a better flavor and more interesting texture. Unfortunately, steel cut oats generally take about 30 minutes in a pot on a stove to get it to the soft consistency you want in oatmeal.

My favorite way to make the cooking easier is to put it in a slow cooker or a rice cooker with a porridge or slow cook cycle.

"Creamy Breakfast Oatmeal" from The Ultimate Rice Cooker Book is my favorite recipe for steel-cut oats.

There's not much simpler than loading a cooker with ingredients and pressing a button, but that's about it for this one. Here's what I put in:

2/3 c steel-cut oats
1 3/4 c vanilla soymilk (or regular soymilk plus 1 t vanilla extract)
1 1/4 t cinnamon
pinch of sea salt
2 T maple syrup
1/4 c golden raisins

And here's what it produces...

The consistency is still creamy, but the little nuggets of oats remain somewhat chewy. It's absolutely a fun and delicious way to eat hot cereal.

Upon refrigeration, the oats harden up a bit so re-heating with a little added liquid is necessary.

Another way to speed up the cooking of steel-cut oats is to soak the oats overnight. Abbie from Foods That Fit very cleverly adds an herbal tea bag or two to soak with the oats for added infused flavor.

Following the overnight soak, normal pot cooking drops to seven or eight minutes. For this soymilk based recipe, just soak it in the refrigerator.

CREAMY BREAKFAST OATMEAL RATING - 9

Abbie also has a new blog post about another breakfast item she came across on the web - granola custom made to your specifications. Check it out here.

Saturday, March 21, 2009

Running Injured

I have to vent.

You may have noticed in my profile that I'm a long-distance runner. I run the New Orleans Mardi Gras Marathon or Half-Marathon every year. I have also run the 26.2-mile distance in other states as well. Here's a picture around Mile 7 from this year's race in February.

But the biggest race (in terms of number of runners and the excitement generated) I run each year is the Crescent City Classic, a 10K race in New Orleans. At its peak it had nearly 30,000 runners, but post-Katrina it's about 17,500.

The only race I have run with more runners was the Marine Corps Marathon in Washington, DC, which had about 29,000 entrants.

I've never made the top 500 finishers in the CCC, which would get my name in the newspaper and win a free race poster. My best finish was last year when I came in 628th.

But since I went vegan in May 2008, all of my race times have improved. I don't think that's coincidental at all.

I very nearly set a PR (personal record) in a 5K race in November while qualifying for a forward spot in the CCC. It would have been a PR if I hadn't run into a truck - yes, a parked truck. Don't ask.

The Half-Marathon in the picture above was the second fastest Half-Marathon I ever ran, second only to the first half of my fastest full Marathon ever, which was a decade earlier. In short, I've been cooking since going vegan.

With the Crescent City Classic just three weeks away, I reinjured both strained calves today that had semi-healed, but lingered for awhile now.

It all started about six weeks ago with my attempt to refine my running form biomechanically. Without knowing what I was doing I strained my calves. Since I realized what I did wrong, I have corrected my form and taken it easy with more rest days, massages, etc. The soreness never went away completely, but I was managing.

Unfortunately, I should have just shut it down and let it totally heal. I have had to cut my last two runs short because of extremely sharp pains - first in my left calf three days ago (followed by a couple of off days to let it rest), and then in my right calf today.

I'm hoping that if I have to give it two weeks rest, I can heal enough to let me get a couple of training runs in before the race. Even then I certainly won't be at my best.

I know - if I can't do it there's always next year. But it's so frustrating.